This guide details how to resolve account suspension issues in cross-border operations by configuring static residential IPs in Clash. By using Relay Proxy configurations and pure ISP nodes from OkkProxy, you can enhance account authority and ensure business stability.
Why Must You Use Static Residential IPs for Cross-Border Business?
For activities like social media management (TikTok, Instagram), e-commerce (Amazon, eBay), or using AI tools (ChatGPT, Gemini), the biggest challenge is account suspension. The core cause is often a high IP Risk Score.
Most “airport” (VPN provider) nodes are shared by thousands of users and typically use IDC (Data Center) IPs. These are easily identified by big data detection as proxy tools, triggering platform risk controls.
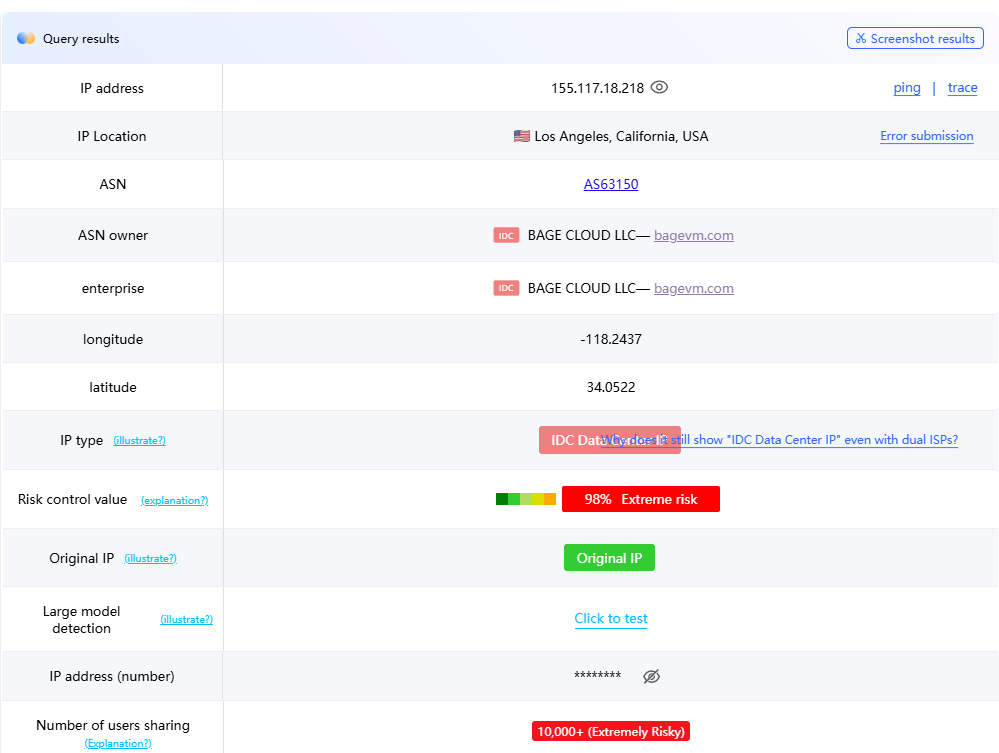
Testing website: https://ping0.cc/ip/
What is a Relay Proxy (cascading)?
The underlying technology for setting up a static residential IP in Clash is called “Relay Proxy”.
Traffic Path: Your Device → Airport Node (1st Hop/Transit) → Static IP (2nd Hop/Final Exit) → Target Website.
Core Advantage: You leverage the high bandwidth and stability of airport nodes while maintaining the clean Residential ISP identity provided by OkkProxy.
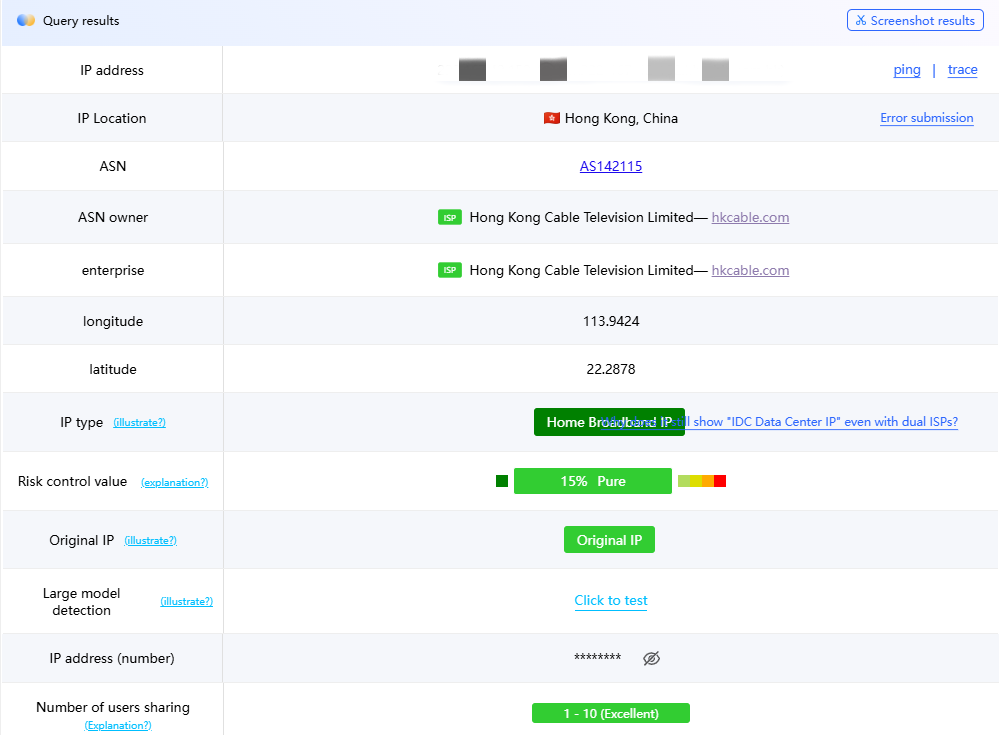
Testing shows that using OkkProxy Static ISP nodes results in an IP identified as “Home Broadband” with a risk score as low as 15% (Extremely Pure) and minimal shared users (1–10 people).
Method 1: Advanced Configuration for macOS (Code Editing)
For macOS users, modifying the config.yaml file allows for the most precise control.
1. Preparation
Get OkkProxy Info: Obtain the server address, port, username, and password.
Download Airport File: Save your subscription as airport.yaml in the ~/.config/clash/ directory.
2. Edit the Configuration
Create or edit config.yaml with these core modules:
# Clash Basic Configuration
[cite_start]port: 7890 # HTTP proxy port [cite: 23]
[cite_start]socks-port: 7891 # SOCKS5 proxy port [cite: 23]
[cite_start]allow-lan: true # Allow LAN connections [cite: 23]
[cite_start]mode: rule # Rule mode [cite: 23]
[cite_start]log-level: info # Log level [cite: 23]
[cite_start]external-controller: :9090 # External controller port [cite: 23]
# ==================== Proxy Node Configuration ====================
proxies:
– [cite_start]name: “Static-ISP-Node” # Custom node name [cite: 23]
[cite_start]type: socks5 # Proxy type (socks5/http/vmess/trojan) [cite: 24]
[cite_start]server: 38.213.68.174 # Replace with your Static IP address [cite: 24, 35]
[cite_start]port: 6666 # Replace with your Static IP port [cite: 24, 35]
[cite_start]username: your_user # Replace with your username [cite: 24, 35]
[cite_start]password: your_pass # Replace with your password [cite: 24, 35]
[cite_start]tls: false # Enable TLS [cite: 24]
[cite_start]skip-cert-verify: true # Skip certificate verification [cite: 24]
[cite_start]udp: true # Enable UDP support [cite: 24, 35]
# ==================== Proxy Provider Configuration ====================
proxy-providers:
[cite_start]MyAirport: # Custom provider name [cite: 25]
[cite_start]type: file # Type: file [cite: 25]
[cite_start]path: ./airport.yaml # Path to your airport config file [cite: 25]
[cite_start]health-check: # Health check settings [cite: 25]
enable: true
[cite_start]interval: 600 # Check interval in seconds [cite: 25]
url: http://www.gstatic.com/generate_204
# ==================== Proxy Group Configuration ====================
proxy-groups:
# Main Selection Group
– name: Node-Selection
[cite_start]type: select [cite: 26]
proxies:
– [cite_start]Relay-Proxy # Recommended: Chain Proxy [cite: 26]
– [cite_start]Airport-Nodes # Airport only [cite: 26]
– [cite_start]Static-ISP-Node # Static IP only [cite: 26]
– [cite_start]DIRECT # Direct connection [cite: 26]
# Relay Proxy Group (Core Configuration)
– name: Relay-Proxy
[cite_start]type: relay # Relay type enables proxy chaining [cite: 26]
proxies:
– [cite_start]Airport-Nodes # Hop 1: Airport Node (Speed) [cite: 27, 40]
– [cite_start]Static-ISP-Node # Hop 2: Static IP (Exit Identity) [cite: 27, 40]
# Airport Node Selection Group
– name: Airport-Nodes
[cite_start]type: select [cite: 27]
use:
– [cite_start]MyAirport # References the proxy-provider above [cite: 27]
# Media/Service Specific Groups
– name: Global-Media
type: select
proxies:
– Node-Selection
– Relay-Proxy
– [cite_start]DIRECT [cite: 28]
# ==================== Routing Rules ====================
rules:
– DOMAIN-SUFFIX,google.com,Relay-Proxy
– [cite_start]GEOIP,CN,DIRECT # Direct connection for mainland China IPs [cite: 31]
– [cite_start]MATCH,Final-Match # Default for all other traffic [cite: 31]
A. Proxy Node Configuration
Add the OkkProxy static ISP node under the proxies section:
YAML
proxies:
– name: “OkkProxy-Static-ISP”
[cite_start]type: socks5 # Choose socks5 or http [cite: 32]
[cite_start]server: 38.213.68.174 # Replace with your OkkProxy address [cite: 32]
[cite_start]port: 6666 # Replace with your port [cite: 32]
[cite_start]username: your_user # Your username [cite: 32]
[cite_start]password: your_pass # Your password [cite: 32]
[cite_start]udp: true # Enable UDP support [cite: 32]
B. Relay Proxy Group Setup
This is the key step. Add a relay type in proxy-groups:
YAML
proxy-groups:
– name: Relay-Exit
type: relay # Must be relay type
proxies:
– [cite_start]Airport-Group # Step 1: Use airport node for speed [cite: 35]
– [cite_start]OkkProxy-Static-ISP # Step 2: Use static residential IP for exit [cite: 35]
3. Load and Verify
Select “Reload Config” in ClashX. Switch to the “Relay-Exit” group and visit ip.sb to confirm the IP matches your OkkProxy address.
Method 2: Windows Configuration (Profile Injection)
Windows users (Clash for Windows) typically modify existing Profile files.
1. Locate Config:
Go to C:\Users\YourUsername\.config\clash\profiles\ and find your .yaml subscription file.
2. Add Node:
Insert the OkkProxy node at the top of the proxies: module. SOCKS5 is recommended for better compatibility.
Create Relay Group: In the proxy-groups: module, add the relay group:
YAML
– name: Account-Nurturing-Relay
type: relay
proxies:
– Auto-Select # Airport auto-speed test group for fastest 1st hop
– OkkProxy-Static-ISP # Pure residential exit
3. Troubleshooting
Ensure you use spaces (not Tabs) for YAML indentation and check for accidental spaces in your username/password.
Method 3: Clash Verge GUI Configuration (Version lower than 1.18.6)
Clash Verge is the best choice for those who prefer not to edit code.
1. Set Up Node:
In the subscription editing feature, click “Add Proxy Node” and enter your OkkProxy credentials.
2. Edit Proxy Group:
Group Type: Select “relay”.
Name: e.g., “OkkProxy-Residential-Relay”.
Members: Add your airport subscription (e.g., “Auto-Select”) as the first member and the OkkProxy static node as the second.
3. Enable
Switch to Global mode or select this group under Rule mode.
Conclusion: Why Choose OkkProxy Static ISP?
While setting up a relay is simple, finding a high-quality exit IP is the challenge. OkkProxy offers several advantages:
Extremely Low Risk: A 15% risk score ensures “Extreme Purity”.
True ISP Attributes: Identified as “Residential/Home Broadband,” essential for warming up and maintaining accounts.
Stability: Long-term static IPs prevent account flags caused by frequent IP changes.
Usage Recommendations and Optimization Tips
Scenario Selection: For everyday web browsing, it’s recommended to connect directly to the proxy server for faster speeds. When managing banking, payment, or social media accounts, please be sure to enable “Chain Proxy”.
Speed Test Verification: Regularly visit https://ping0.cc/ip/ to check IP quality. If you notice a surge in “Shared Users” or the “Risk Value” turns red, it’s recommended to contact OkkProxy immediately to change to a new static IP.